Introduction to YouDebug – Scriptable Java Debugger

April 28th, 2012 Comments off

I gave a short talk on YouDebug at the Mannheim Java User Group (Majug).
YouDebug is a Java debugger developed by Kohsuke Kawaguchi, which can be scripted in Groovy.

The slides are available here:


CC BY-NC-SA The slides are available under the CreativeCommons license BY-NC-SA.

Categories: general Tags:

Presentation: Introduction to Amazon Elastic Beanstalk

April 22nd, 2011 Comments off

Lars Vogel gave a talk on Google AppEngine at the Mannheim Java User Group (Majug).

Afterwards, I gave a short introduction to Amazon Elastic Beanstalk. The slides are available here:


CC BY-NC-SA The slides are available under the CreativeCommons license BY-NC-SA.

Categories: amazon, beanstalk, cloud, ec2, presentation Tags:

How to customize an Amazon Elastic Beanstalk instance

February 8th, 2011 9 comments

The default Amazon Elastic Beanstalk AMI provides a Java-based application container with Apache Tomcat as the work horse. All you have to do is to deploy a standard Java WAR file containing your web application.

But sometimes, the standard AMI does not provide everything. Maybe the Apache configuration needs to be tweaked or some package, e.g. a local memcached server, is missing.

Customizing the Beanstalk AMI is easy, there are only a few simple steps, which are outlined here.

First of all, start the AMI to be customized in the AWS console. Note: as described by foremosttravel in the Beanstalk forum, the instance should be started from the EC2 console, NOT the Beanstalk console, as running the AMI within the Beanstalk environment may lead to it being terminated during the EBS snapshot, as it might fail to answer to the Beanstalk health checks.

Preparation

So here are the step by step instructions for the preparation:

  1. Go to the EC2 console
  2. Select region US-East, as Beanstalk is currently available only there
  3. Click Launch instance
  4. Enter either ami-100fff79 for the 64bit AMI or ami-060fff6f for the 32bit AMI (as of Feb 8th, 2011; these AMIs contain fixes to preserve the original hostname and protocol, which are stripped by the load balancer)


    Start instance from EC2 console

  5. Click Select, then Continue, until the step Create Key Pair
  6. Choose an existing key pair or create a new one. This will be used to access the running instance using SSH
  7. In the next step, specify an appropriate security group, which allows SSH access, e.g. SSH
  8. Press continue and finally launch the instance
  9. In the instance list, press the right mouse button over the instance and choose Connect
  10. Copy the SSH command line, adjust the path to your private key and connect to the instance using a SSH client.

    Note: you need to connect as user ec2-user, root access can be obtained using the command sudo su -. See this blog post for details on how to access the instance.


Customization

Now we are free to customize the AMI’s files to our heart’s content.

Note: As the AMI is running outside the Beanstalk environment, Apache, Tomcat, and HostManager (the software interface to Beanstalk), are not running, as they didn’t get the expected parameters, such as the path of the application to start. This doesn’t matter, as soon as we start the customized AMI in an Beanstalk environment, everything works again.

As a proof of concept, we change HostManager‘s default index page (/opt/elasticbeanstalk/srv/hostmanager/views/index.erb) to contain the following HTML body:

<body style="font-family:Verdana,Arial,Sans-serif;">
<div class="logo">
<img src="http://awsmedia.s3.amazonaws.com/logo_aws.gif" />
<h2>Host Manager</h2>
<b>Haz customization!</b>
</div>
</body>

Note: when changing HostManager or the Apache configuration, please make sure, that HostManager still answers to Beanstalk requests on /_hostmanager and the application to health checks on /, otherwise the instance will be terminated and another will be started!

Persisting changes

Now that we are done, we need to create an EBS snapshot to preserve our customizations. The AMI is EBS-backed, so a snapshot can be used to register an AMI, which is based on the snapshot.

Again, here are the step by step instructions:

  1. Remove eveything you do not want to remain in the instance such as the bash history, SSH keys, …
  2. Create an EBS snapshot, either from the EC2 console or the command line tools. See the user guide for details.
  3. You now have an AMI. See Images > AMI on the left side of the EC2 console and choose Owned By Me in the AMI tab to view your newly create AMI. Note down the AMI id.

If you want to make some more changes, keep the current instance running, while you test your changes from within Beanstalk. After a test drive (see below), make some more changes and create another image. Rinse and repeat until you are satisfied with the results. Don’t forget to clean up any unnecessary EBS snapshots and AMIs, as they cost actual money!

Start customized instance in Beanstalk

If you want to test-drive your customized AMI, you need to start an Beanstalk environment with the id of the customized AMI. There are two ways to perform this, via the Beanstalk console or from the command line.

Via Beanstalk console

  1. Go to the Beanstalk console
  2. Create an environment
  3. Wait for everything to be started so you can change the configuration
  4. Adjust the AMI id as described in the user guide
  5. Restart the environment
  6. Test your changes. In our example, we go to the changed HostManager index page at http://myenv.elasticbeanstalk.com/_hostmanager

Via command line

We use my simplified script to start an Amazon Elastic Beanstalk application from command line. See here for a detailed description. We can specify all parameters right from the start, so we do not need to wait for the initial start, before we can adjust the configuration.

  1. Download the script from GitHub
  2. Start an environment with the following command:
    eb-create-app.sh -a myapp -i ami-be55a5d7 -t t1.micro -C 64 -e myenv -k mykeypair

    Make sure to specify the id of your AMI as created above. Also don’t forget to specify a keypair, otherwise you won’t be able to log in using SSH. The name of the environment must be unique, as it is also used as CNAME (this can be overridden with -c <CNAME> though)

  3. Test your changes. In our example, we go to the changed HostManager index page at http://myenv.elasticbeanstalk.com/_hostmanager

Outlook

Have fun creating customized instances. Please leave feedback and/or a note in the comments, which describes your changes. I will try to change HostManager to run the Virgo OSGi server instead of Tomcat, so stay tuned for the next installment.

Categories: amazon, beanstalk, ec2 Tags:

Script to start an Amazon Elastic Beanstalk application from command line

February 3rd, 2011 Comments off

After playing around with Amazon Elastic Beanstalk, I started to explore the command line tools.

Starting an Amazon Elastic Beanstalk application from the AWS console is easy and reasonably fast. The main problem is that you can’t currently provide additional settings such as the instance type (e.g. m1.small or t1.micro), a SSH key or application parameters.

After starting the application environment, it must be stopped again, before the configuration can be changed. This costs an instance hour but, more importantly, this procedure takes quite a while, as AWS must reconfigure the load balancer, auto-scaling group, start your instance(s), etc.

I created a script, which can be used to start an application environment from the command line. The most important parameters can be set as command line parameters:

All you need is to install the Elastic Beanstalk command line tools and my script.

Example

Starting an application myapp with environment myenv on a m1.small instance with SSH key mysshkey is as simple as:

eb-create-app.sh -a myapp -k mysshkey -e myenv -t m1.small -f 'mybucket/myapp.war'

Some notes:

  • the application WAR file must already be uploaded to S3. The format of the file name (parameter -f) is bucketname/key. If the file name is not specified, Beanstalk will deploy the sample application
  • the environment can only be created, if the CNAME (which is identical to the environment name, if not specified with -c) is not already used. The CNAME is used as sub-domain under elasticbeanstalk.com. When creating an environment with name (and CNAME) myenv, the full DNS name would be myenv.elasticbeanstalk.com
  • starting an environment will fail, if the SSH key name does not exist. You can look up the name of your SSH key in the EC2 console

Elastic Beanstalk Parameters

Elastic Beanstalk provides many parameters, which can be set. A full list can be obtained using elastic-beanstalk-describe-configuration-settings, also from the command line tools (NOTE: fix required!).

I created a list of all Elastic Beanstalk configuration options using another script (requires ruby gem jazor):

The long version in JSON format is available here.

Final words

Starting an application environment is easy and the command line tools help a lot. There are still some bugs, but I’m sure, the Beanstalk team will address them soon. The forum is a great resource.

My next post will be about creating a customized Beanstalk AMI. Stay tuned!

Categories: amazon, beanstalk, ec2 Tags:

Dissecting an Amazon Elastic Beanstalk instance

January 22nd, 2011 5 comments

Amazon Elastic Beanstalk provides a PaaS similar to Google AppEngine, bundling many of their existing offerings such as Elastic Compute Cloud (EC2), Simple Storage Service (S3), Simple Notification Service (SNS), Elastic Load Balancing, Auto Scaling, and monitoring using Cloud Watch into a simple to use service. Additionally, other Amazon services such as SimpleDB, Relational Database Service (RDS), Simple Queue Service (SQS) may be used as well.

Currently, Elastic Beanstalk provides a Java-based application container with Apache Tomcat as the work horse. All you have to do is to deploy a standard Java WAR file containing your web application.

Simply create a Java web application with Spring MVC, Grails, OSGi, Eclipse RAP, or any other of the numerous Java web frameworks and upload it using the AWS web console.

Additional containers for other platforms such as Ruby, Python or PHP may follow later, but as Tomcat hosts standard Java WAR files, anything with a Java implementation may be run. Ruby apps based on Rails or Rack using Warbler and JRuby, Python apps using Jython, even PHP apps can be made to run on Beanstalk.

In this blog post, I’ll dive into the inner workings of a Beanstalk server instance and poke around its internals. I invite you to come along for the ride.

Accessing your instance
The first step in dissecting a Beanstalk instance is getting access via SSH.
In order to acces your running instance(s), you first need to configure the SSH key pair to be used:

Configuration dialog in Elastic Beanstalk web console

Configuration dialog in Elastic Beanstalk web console

Enter the name of a key pair as configured in your EC2 web console. See the EC2 guide and the description in the Elastic Beanstalk guide for details on creating and configuring a key pair.

Setting the key pair requires a restart of your Beanstalk environment, which may take a couple of minutes.

Finally look up your instance id and get the instance’s hostname. Connecting to the server is now as simple as this:

ssh -i .ec2/mykeypair.pem ec2-user@ec2-184-72-134-2.compute-1.amazonaws.com

Please note, that you need to connect as user ec2-user, root access can be reached using the command

sudo su -

Getting around your instance
The first steps are to collect some interessting facts. The instance uses a Amazon Linux AMI (release 2010.11.1 (beta), README). The AMI id for the ElasticBeanstalk-Tomcat6-32bit is ami-7609f81f, the kernel id is aki-407d9529. The instance is EBS-based and there is no ephemeral storage. Currently, Beanstalk is only available in the US East zone.

Software
The process list reveals: along with Apache Tomcat, Beanstalk uses the venerable Apache Web Server. Additional software includes Bluepill for basic process monitoring, and Amazons own HostManager (see below), which is run within a Thin web server.

Network setup
Elastic Beanstalk scales EC2 instances as needed. Therefore the first target is a load balancer provided by Elastic Load Balancing. Each instance runs Apache as the front end on port 80, with web request being reverse proxied into Tomcat on port 8080. Requests for URI /_hostmanager are forwarded to HostManager on port 8999.

CloudWatch performs health checks by periodically requesting the root page (URI /) of your application. Both health check URI and frequency are configurable. If an instance is no longer available or the load changes, CloudWatch starts or stops instances.

Application stack
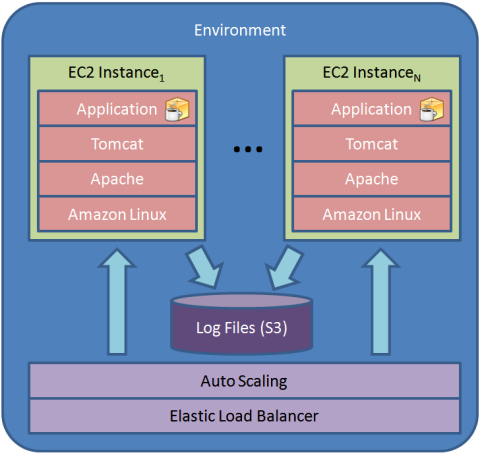
[Image from AWS Elastic Beanstalk Concepts blog post]

HostManager
Local instance management is performed by Amazons HostManager. HostManager is a Ruby application based on Rack and running in a Thin server on port 8999. It receives requests on URI /_hostmanager.

Some examples from the access log:

72.21.217.96 (72.21.217.96) - - [21/Jan/2011:22:00:45 +0000] "POST /_hostmanager/tasks HTTP/1.1" 200 368 "-" "AWS ElasticBeanstalk Health Check/1.0"
10.223.61.43 (10.223.61.43) - - [21/Jan/2011:22:01:05 +0000] "GET /_hostmanager/healthcheck HTTP/1.1" 200 90 "-" "ELB-HealthChecker/1.0"
10.122.19.154 (10.122.19.154) - - [21/Jan/2011:22:01:11 +0000] "GET /_hostmanager/healthcheck HTTP/1.1" 200 90 "-" "ELB-HealthChecker/1.0"
10.223.61.43 (10.223.61.43) - - [21/Jan/2011:22:01:36 +0000] "GET /_hostmanager/healthcheck HTTP/1.1" 200 90 "-" "ELB-HealthChecker/1.0"
10.122.19.154 (10.122.19.154) - - [21/Jan/2011:22:01:42 +0000] "GET /_hostmanager/healthcheck HTTP/1.1" 200 90 "-" "ELB-HealthChecker/1.0"
72.21.217.96 (72.21.217.96) - - [21/Jan/2011:22:01:46 +0000] "POST /_hostmanager/tasks HTTP/1.1" 200 368 "-" "AWS ElasticBeanstalk Health Check/1.0"
10.223.61.43 (10.223.61.43) - - [21/Jan/2011:22:02:07 +0000] "GET /_hostmanager/healthcheck HTTP/1.1" 200 90 "-" "ELB-HealthChecker/1.0"
10.122.19.154 (10.122.19.154) - - [21/Jan/2011:22:02:13 +0000] "GET /_hostmanager/healthcheck HTTP/1.1" 200 90 "-" "ELB-HealthChecker/1.0"
10.223.61.43 (10.223.61.43) - - [21/Jan/2011:22:02:38 +0000] "GET /_hostmanager/healthcheck HTTP/1.1" 200 90 "-" "ELB-HealthChecker/1.0"
10.122.19.154 (10.122.19.154) - - [21/Jan/2011:22:02:44 +0000] "GET /_hostmanager/healthcheck HTTP/1.1" 200 90 "-" "ELB-HealthChecker/1.0"
72.21.217.96 (72.21.217.96) - - [21/Jan/2011:22:02:47 +0000] "POST /_hostmanager/tasks HTTP/1.1" 200 368 "-" "AWS ElasticBeanstalk Health Check/1.0"

Files
HostManager is installed in /opt/elasticbeanstalk/srv/hostmanager. A file list can be found here. /opt/elasticbeanstalk/lib also contains a full Ruby 1.9.1 installation.

Some log files can be found at /opt/elasticbeanstalk/var/:

/opt/elasticbeanstalk
/opt/elasticbeanstalk/var
/opt/elasticbeanstalk/var/state
/opt/elasticbeanstalk/var/state/hostmanager.pid
/opt/elasticbeanstalk/var/state/healthcheck
/opt/elasticbeanstalk/var/tmp
/opt/elasticbeanstalk/var/log
/opt/elasticbeanstalk/var/log/LogDirectoryMonitor.log
/opt/elasticbeanstalk/var/log/DaemonManager.log
/opt/elasticbeanstalk/var/log/bluepill.log
/opt/elasticbeanstalk/var/log/hostmanager.log
/opt/elasticbeanstalk/var/log/ApplicationHealthcheck.log
/opt/elasticbeanstalk/var/log/CatalinaLogMonitor.log

Final words
That’s all for today’s blog post. Further posts will take a closer look at HostManager and deployment including the application setup sequence.

I’m looking forward to any feedback and additional information.

Maybe we can even hack HostManager to accept other application containers, e.g. for OSGi applications.

Introducing groovyx.osgi: OSGi DSL for Groovy

January 18th, 2011 2 comments

Programming for and in an OSGi environment is sometimes hard. Getting started is hard as well. groovyx.osgi helps both setting up an OSGi environment and simplifies programming by providing support for easy access to OSGi services, etc.

Setting up an OSGi environment

Setting up an OSGi environment is hard work: you have to download an OSGi implementation (usually Apache Felix or Eclipse Equinox, but there are others as well). Then there are many dependencies to download. There is an excellent tool, which simplifies the startup part: Pax Runner. Pax Runner can resolve dependencies from URLs or Maven repositories and start the OSGi framework.

One problem remains: you need to download Pax Runner and the configuration is a (set of) static text file(s). To simplify things and allow scripting in the “recipes”, the module groovyx.osgi.runtime (README) provides a nice Groovy DSL for creating and starting an OSGi framework.

Features:

  • provision bundles from filesystem, web, Maven repositories
  • run Eclipse Equinox or Apache Felix OSGi runtimes
  • flexible Groovy DSL, fully programmable
  • lifecycle callback closures

The dependency resolution code is derived from Grails and was written by Graeme Rocher.

Simple example:

A more complete example including automatic download of dependencies can be found here. Another example provisions an entire OSGi environment including Apache Felix WebConsole on port 8081.

Simplified Programming Model

The OSGi programming model is based on services (or micro-services, as Peter Kriens likes to call them), which are accessed via the BundleContext. Services are dynamic, they can come and go any time during the lifetime of an OSGi application. This is both a strength, as an application can be extended or updated without application shutdown, and a weakness, as it requires careful handling of service dynamics.

Looking up and using a service requires a lot of boiler plate code. A simple example in Java:

The equivalent Groovy code using module groovyx.osgi looks like this:

The groovyx.osgi module (README) contains helper classes to make OSGi programming easier. This package was inspired by ScalaModules.

Features:

  • simplifies working with OSGi service registry
  • safe access to OSGi services, without fear for OSGi dynamics
  • Service finder DSL
  • OSGi service filter DSL.

The filter support is derived from the filter4osgi project and was contributed by Hamlet D’Arcy.

An overview on basic usage of Groovy with OSGi can be found at the Groovy Homepage.

Source code and binaries

groovyx.osgi and groovyx.osgi.runtime are released under the Apache 2.0 license. The code is available at GitHub.

You can either download groovyx.osgi and groovyx.osgi.runtime 0.1 from GitHub or install it using Grape, Ivy, or Maven from the Maven repository at https://github.com/jetztgradnet/repository/raw/master.

A simple example using Grape:

This script is executable with nothing but Groovy (>= 1.7.5) installed.

Roadmap

The following items are planned for the next releases:

groovyx.osgi

groovyx.osgi.runtime

  • add support for pre-defined provisioning profiles
  • add support for OSGi ConfigurationAdmin
  • improve handling of external OSGi runtimes
  • improve docs

Grails OSGi plugin

Final thoughts

OSGi provides no silver bullet for modularization, but it greatly helps, once you wrapped your head around bundles, services and dependencies. It’s not always an easy road, but there are many helpful tools and people out there. I hope, groovyx.osgi can help you to create great applications. Have fun playing in your OSGi sandbox and don’t forget to send me your thoughts. Any feedback is greatly appreciated, either in the comments or open a issue at GitHub.

Categories: groovy, osgi Tags: ,

Grails on OSGi: Released Grails OSGi plugin 0.2.1

July 27th, 2010 6 comments

I just released a small update for the OSGi plugin, which fixes dependency resolution for Spring DM.

Thanks to lemnitram and Klaus Baumecker for reporting it.

Spring DM 2.0 is currently only available as snapshot release (2.0.0.M1). The jars used to be available from other repositories (e.g. SpringSource Enterprise Bundle Repository (EBR)), but they have vanished, so I needed to add the Spring Milestone Repository.

For installation and usage of the plugin see me previous blog post and the docs.

Spring DM has been donated to the Eclipse Foundation by SpringSource, where it will be part of the Gemini Blueprint and Gemini Web projects. This means, that Spring DM 2.0 will never be released, so the OSGi Plugin needs to be ported to use Gemini Blueprint and Gemini Web instead. This will happen in the 0.3 release.

Categories: general Tags:

Grails on OSGi: Released Grails OSGi plugin 0.2

July 12th, 2010 3 comments

I just released version 0.2 of my OSGi plugin for Grails. The OSGi plugin is released under the Apache License 2.0.

The Grails OSGi plugin adds support to package and run a Grails application as an OSGi bundle. The bundle(s) may be run in an ad hoc assembled OSGi container or deployed to an external OSGi app server such as SpringSource DM Server, Eclipse Virgo, or Apache Karaf.

See my blog series for earlier thoughts and information for running a Grails application in an OSGi environment as well as concepts of and basic information on OSGi.

This post and the following installments of the series will show how to use the plugin and present some examples.

Installation

Simply call grails install-plugin osgi to install the OSGi plugin.

Usage

Creating an OSGi bundle from the Grails application

grails bundle
grails prod bundle

Running the bundle

grails run-bundle
grails prod run-bundle

The application can be accessed at http://localhost:8080/myapp-0.1/.

Note: at first start the OSGi runtime is assembled, which may take some time, while Ivy is downloading the Internet…

Note: if the bundle exists, it won’t be re-created automatically after changes. So for now use parameter -forceBundle after changing something in the Grails app: grails run-bundle -forceBundle.

Accessing the bundle context

The bundle context is the primary interface to the OSGi framework. It can be used to find and register services and interact the environment.

The bundle context is available from Grails’ parent ApplicationContext as bean bundleContext. It can be injected into all Spring-managed beans, i.e. all Grails artifacts, like Controllers, Services, etc.

In order to get a reference to the BundleContext, an artifact needs to define a reference with the name bundleContext.

Example: controller accessing bundle context

class OsgiTestController {
    def bundleContext
    def index = {
        def bundles = []
        if (bundleContext) {
            bundles = bundleContext.bundles
        }
        else {
            flash.message = "bundleContext NOT available"
        }
        [ bundles: bundles ]
    }
}

Changes since version 0.1

  • using Spring DM instead of Pax Web as Web extender
  • updated Apache Felix WebConsole
  • replaced (most) dependencies from bundle by OSGi bundles from the SpringSource Enterprise Bundle Repository (EBR)
  • provide access to OSGi BundleContext to artifacts (controllers, services, …) via Spring injection as bean bundleContext

How it works

In order to be a valid OSGi bundle, the application is war’ed and provided with the necessary bundle manifest headers (see scripts/_Events.groovy for details).
The bundle can be created using grails bundle.

The OSGi runtime is assembled in the target/osgi directory and uses the Eclipse Equinox OSGi framework, Spring DM.

In the current version, most libraries from WEB-INF/lib are replaced by equivalent OSGi bundles from the SpringSource Enterprise Bundle Repository (EBR). Only Hibernate and Grails libs retain in the bundle.

Grails jars already are OSGi bundles, but they cannot currently be installed cleanly in a OSGi container, as they contain circular dependencies and some other dependencies can not be satisfied (e.g. the Radeox library used by the Grails Wiki is no longer maintained, but it shouldn’t be referenced from the Grails runtime anyway…).

There are bundles for Hibernate but due to a bug (possibly in Equinox), Hibernate Cache can not be resolved by the Spring ORM module (see “SPR-7003”:https://issues.springsource.org/browse/SPR-7003 for a description of this problem).

The parent ApplicationContext has been replaced in web.xml by an OSGi-aware variant: OsgiBundleXmlWebApplicationContext. It knows how to export and import OSGi services as/from Spring beans through Spring XML files. These features are currently hidden, but they will be exposed in the next version of the OSGi plugin and made easier through the BeanBuilder DSL and the OSGi namespace.

Roadmap

  • make bundle generation configurable (e.g. include/exclude dependencies, …)
  • make OSGi runtime created by grails run-bundle and grails assemble-osgi-runtime configurable
  • support auto-reloading of changed artifacts
  • create sub class of GrailsApplicationContext, which implements ConfigurableOsgiBundleApplicationContext
  • export main Grails beans and application context as OSGi service
  • export services as OSGi service (via static expose = 'osgi')
  • implement deployment to SpringSource DM Server or its successor Eclipse Virgo
  • implement deployment to Apache Karaf
  • Spring DM has been donated to Eclipse, so it should be replaced by its successor Eclipse Gemini

Getting around the OSGi runtime

Web Console

The “Felix Web Management Console”:http://felix.apache.org/site/apache-felix-web-console.html provides excellent insight into the inner workings. It can be accessed at http://localhost:8081/system/console/ with user “admin” and password “admin” (Note: the web console runs on a different port!).

Shell Console

The command grails run-bundle drops the user in the Equinox Shell (press RETURN if you don’t see the osgi> prompt). Running grails run-bundle -remoteConsole [port] opens a console with telnet access on the specified port or on port 8023, if omitted. Only a single user can use the console at any time.

Categories: general Tags:

Released Grails Spy plugin 0.2

July 6th, 2010 Comments off

I just released version 0.2 of my Grails Spy plugin.

About

The Grails Spy plugin provides some views to inspect Grails internals such as the Spring application context(s), artefacts, etc.

As most of the beans of the Grails WebApplicationContext are constructed at runtime with the help of a BeanBuilder, there is no Spring xml file with bean definitions.

In order to browse the dynamic bean definitions, Grails Spy can be used to watch into an application’s guts.

Installation

grails install-plugin spy

Usage

Simply install the plugin, enable the Spy controller for the dev environment and run grails run-app. Then browse to http://localhost:8080/yourapp/spy and enjoy.

Changes

  • For security reasons the Spy controller must now be enabled in Config.groovy:
    grails.plugins.spy.enabled = true
    

    The plugin can be enabled or disabled individually for each environment. Example:

    environments {
        production {
            grails.serverURL = "http://www.changeme.com"
        }
        development {
            grails.serverURL = "http://localhost:8080/${appName}"
    	grails.plugins.spy.enabled = true
        }
        test {
            grails.serverURL = "http://localhost:8080/${appName}"
        }
    }
    
  • 'inspect' is now the default action for the spy controller, so it can be called as http://localhost:8080/yourapp/spy instead of http://localhost:8080/yourapp/spy/inspect

License

The Spy plugin is released under the Apache License 2.0.

Source code and Issues

The source code is hosted at GitHub, issues can be reported here.

Screenshots

Eye-candy you say? See below:

GrailsSpy: GrailsApplication

GrailsSpy: ApplicationContext view

GrailsSpy: bean view

Categories: grails, plugin, spy Tags:

Grails Spy plugin mentioned in Grails podcast

January 11th, 2010 1 comment

My Grails Spy plugin was mentioned in the episode 103 (at 0:18:30) of Grails Podcast. Thanks, Glen and Sven!

Categories: general Tags: